Configure Pre-Approval Webhooks
What is a Pre-Approval webhook?
A pre-approval webhook is an HTTPS callback that calls an external REST API endpoint as soon as a privacy request is received (or after user identity verification, if that is configured).
The response(s) to the callback allow us to determine whether or not the privacy request is eligible to be automatically approved. If all webhooks respond with eligible, Astralis automatically approves the privacy request for execution. If any webhook responds with not eligible, the request is flagged for manual review by an administrator in the Admin UI — it is not denied.
Why use pre-approval webhooks?
Pre-approval webhooks are useful when you need to integrate external business logic or validation before automatically processing a privacy request. Common use cases include:
- Checking if a customer has an active support ticket or pending transaction that should be resolved first
- Verifying that the requester meets certain criteria in your CRM or customer database
- Integrating with third-party compliance systems that need to review requests
- Applying custom business rules that determine whether a request can be auto-approved
To enable Pre-Approval webhooks, the require_manual_request_approval variable must be set to true. This is required to trigger and process pre-approval webhooks. You can find more information about this variable and how to set it in the execution configuration variables docs
Request lifecycle with pre-approval webhooks
When pre-approval webhooks are configured, a privacy request follows this lifecycle:
- Request submitted. A subject submits a privacy request.
- Identity verified (if configured). The subject verifies their identity via email code.
- Awaiting external review. Astralis fires all configured pre-approval webhooks and waits for responses from your external systems. An administrator can also manually approve or deny the request at any point during this stage without waiting for webhook responses.
- Based on the webhook responses, one of two things happens:
- All webhooks respond "eligible." Astralis automatically approves the request and begins processing. No manual action needed.
- Any webhook responds "not eligible." The request moves to Manual review required status, where it must be manually approved or denied by an administrator in the Admin UI.
Pre-approval webhook responses and status changes are recorded in the activity timeline for each privacy request, giving administrators full visibility into which external systems responded and how.
Set up a pre-approval webhook
This walkthrough configures a pre-approval webhook entirely through the API: require manual approval, build an endpoint on your service, register it as a connection and webhook, reply with an eligibility decision, and verify the flow end to end. To register webhooks through the Admin UI instead, see Configure via the Admin UI.
Prerequisites
Before you begin, make sure you have:
- An HTTPS endpoint your Astralis deployment can reach. Astralis calls out to your service, so the URL must be routable from wherever Astralis runs.
- An API token with the
config:update,connection:create_or_update,webhook:create_or_update, andprivacy-request:readscopes.
Require manual approval for privacy requests
Pre-approval webhooks only fire on requests that need approval, so enable require_manual_request_approval first:
{
  "execution": {
    "require_manual_request_approval": true
  }
}
Set the same value at deploy time with the FIDES__EXECUTION__REQUIRE_MANUAL_REQUEST_APPROVAL=true environment variable. See the execution configuration variables for the full list. While this setting is off, Astralis approves requests without consulting your webhooks.
Build the webhook endpoint on your service
Expose an HTTPS endpoint that accepts a POST carrying the webhook request body — privacy_request_id, identity, and policy_action are the fields most eligibility logic needs — and reads the reply-to-eligible, reply-to-not-eligible, and reply-to-token headers Astralis sends alongside it.
Return a 2xx status as soon as you receive the call. Astralis checks the status code only and discards the response body, so your service can take as long as it needs to reach a decision and send it back over the separate callback described below.
Create an HTTPS connection
Register the endpoint as an HTTPS connection. The key you choose here is what the webhook refers to in a later step:
[
  {
    "name": "My Service Config",
    "key": "my_service_config",
    "connection_type": "https",
    "access": "read"
  }
]
Store the connection secrets
Attach the endpoint URL and the credentials Astralis presents when calling it. Astralis encrypts both values at rest:
{
  "url": "{service-url}/pre-approval-handler",
  "authorization": "test_authorization"
}
An authorization value is always required — it is a mandatory field on the HTTPS connection schema. To have Astralis authenticate with OAuth2 client credentials instead, add an OAuth2 configuration to the same connection; Astralis then uses it in place of the stored authorization value, which goes unused. You can also attach optional static headers that are sent alongside whichever authentication method is active.
Define the pre-approval webhook
Point a webhook at the connection. Astralis calls every webhook in this list on each request, and all of them must reply eligible for a request to auto-approve:
[
  {
    "connection_config_key": "my_service_config",
    "name": "My test webhook",
    "key": "my_test_webhook"
  }
]
This PUT replaces the full list, so include every webhook you want active. To add a second external system, repeat the connection and secrets steps for it and include both entries here. See Define pre-approval webhooks for updating an individual webhook afterward.
Reply with the eligibility decision
Once your service has decided, POST an empty {} body to one of the reply URLs from the request headers, authenticated with the reply-to-token:
POST /api/v1/privacy-request/{privacy_request_id}/pre-approve/eligible
Authorization: Bearer {reply_to_token}
Post to /pre-approve/not-eligible to flag the request for manual review instead. Replying "not eligible" does not deny the request — see Responding to the webhook.
Verify the webhook end to end
Submit a test privacy request, then read back its audit trail with verbose enabled:
{
  "request_id": "pri_029832ba-3b84-40f7-8946-82aec6f95448",
  "verbose": true
}
The response results object is keyed by the entries in the request's activity timeline, so look for these keys:
| Timeline entry | What it confirms |
|---|---|
| Triggered pre-approval webhooks | Astralis called your endpoint. |
| Request auto-approved by pre-approval webhooks | Every webhook replied eligible, and the request moved into processing. |
| Request flagged for manual review by pre-approval webhooks | At least one webhook replied not eligible. The request waits for an administrator. |
The same response carries the request's status. While webhooks are outstanding it is awaiting_pre_approval (shown as Awaiting External Review in the Admin UI); once a webhook replies "not eligible" it becomes pre_approval_not_eligible (Manual Review Required). If the response records no webhook activity at all, check whether the request was flagged as a duplicate; otherwise see Error handling.
Configuration
Pre-approval webhooks can be configured through the Admin UI or via the API.
Configure via the Admin UI
Navigate to Privacy requests > Pre-approval webhooks in the left sidebar to manage your webhooks.
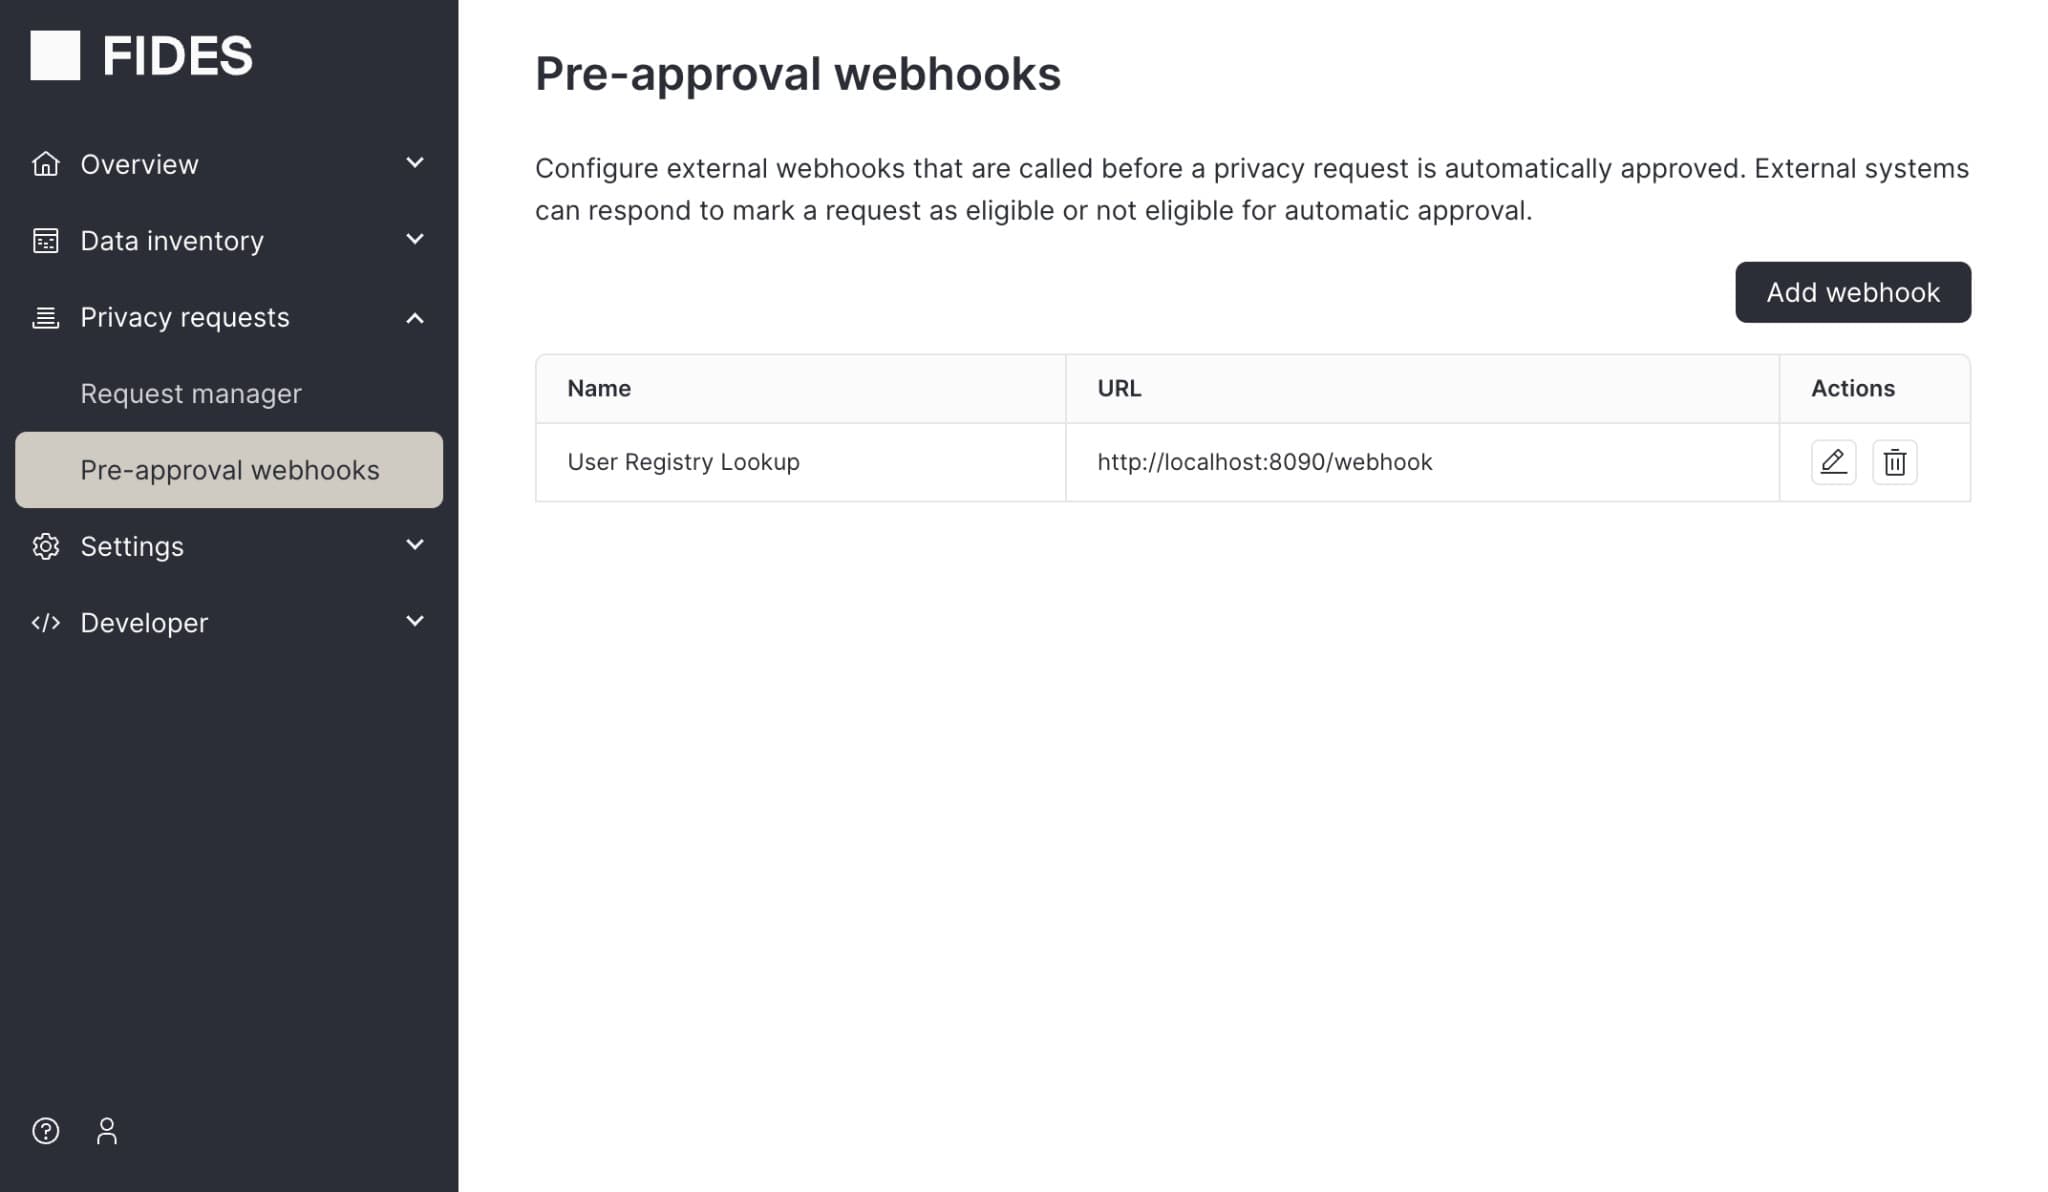
From this page you can:
- Add a webhook. Click the Add webhook button and provide a name, the endpoint URL of your external service, and an authorization header (e.g. a Bearer token or API key).
- Edit a webhook. Click the edit icon in the Actions column to update the webhook name or endpoint URL. Leave the authorization header blank to keep the existing value.
- Delete a webhook. Click the delete icon in the Actions column to remove a webhook.
Configure via the API
You can also configure pre-approval webhooks programmatically using the Astralis API. This involves three steps: creating an HTTPS connection, adding connection secrets, and defining the webhook.
Create an HTTPS Connection
The information that describes how to connect to your API endpoint is represented by a Connection.
[
    {
      "name": "My Service Config",
      "key": "my_service_config",
      "connection_type": "https",
      "access": "read"
    }
]
Authentication
Astralis supports two ways to authenticate its outbound calls to your webhook endpoint: a static authorization secret, or OAuth2 client credentials. These aren't used together — if an OAuth2 configuration exists for the connection, Astralis uses it; otherwise it falls back to the static authorization secret.
Static authorization secret
The credentials needed to access your API endpoint are defined by making a PUT to the Connection Secrets endpoint. These credentials are encrypted and securely stored in Astralis.
    {
        "url": "{service-url}/pre-approval-handler",
        "authorization": "test_authorization",
        "headers": { // optional headers to be attached to the request
          "User-Agent": "Example"
        }
    }
OAuth2 client credentials
You can configure the connection to authenticate its outbound calls using OAuth2 client credentials. When an OAuth2 configuration is present, Astralis fetches an access token from your token endpoint using the client credentials grant (opens in a new tab) and uses it as the bearer token for the webhook request, instead of the static authorization value.
{
    "grant_type": "client_credentials",
    "token_url": "{token-endpoint-url}",
    "scope": "optional_scope",
    "client_id": "{client-id}",
    "client_secret": "{client-secret}"
}| Field | Description |
|---|---|
grant_type | Only client_credentials is currently supported. |
token_url | The URL Astralis requests an access token from. |
scope | Optional OAuth scope to request. |
client_id | The client ID for your OAuth application. |
client_secret | The client secret for your OAuth application. Encrypted and securely stored. |
The same endpoint accepts PATCH (partial update) and DELETE (remove the OAuth configuration).
https connections, and a fresh access token is requested on every webhook dispatch — tokens are not cached between calls. If your token endpoint is slow or rate-limited, this adds latency and a dependency on its availability for every pre-approval webhook call.Define pre-approval webhooks
After you've defined a new Connection, you can create lists of webhooks to run as soon as a privacy request is received.
To create a list of PreApprovalWebhooks:
[
   {
      "connection_config_key":"my_service_config",
      "name":"My test webhook",
      "key":"my_test_webhook"
   },
   {
      "connection_config_key":"my_other_service_config",
      "name":"My test webhook 2",
      "key":"my_test_webhook_2"
   }
]
This creates two webhooks that will both run as soon as a privacy request is created.
This means your webhook with the key my_service_config will receive an API call from Astralis at {service-url}/pre-approval-handler (or whatever URL / path you have set in your Connection Config). Same with your webhook with the key my_other_service_config.
Update a single webhook
To update a single webhook, send a PATCH request to update selected attributes.
The following example will update the PreApprovalWebhook with key my_test_webhook to be Some other name instead of
My test webhook.
{
    "name": "Some other name"
}
Webhook request format
Astralis will send requests to any configured webhooks with the following request body:
{
  "privacy_request_id": "pri_029832ba-3b84-40f7-8946-82aec6f95448",
  "privacy_request_status": "pending",
  "direction": "two_way", // this is always two_way for pre-approval webhooks, meaning your service must use one of the reply paths in the request headers mentioned below
  "callback_type": "pre_approval",
  "identity": {
    "email": "customer-1@example.com",
    "phone_number": "555-5555"
  },
  "policy_action": "access" //  other policy actions are consent, erasure, update
}
These attributes were configured at the time of webhook creation. Known identities are also embedded in the request.
Astralis includes specific headers including data needed to respond to the webhook:
{
  "reply-to-eligible": "/privacy-request/{privacy_request_id}/pre-approve/eligible",
  "reply-to-not-eligible": "/privacy-request/{privacy_request_id}/pre-approve/not-eligible",
  "reply-to-token": "<jwe_token>"
}
Responding to the webhook
You have 2 options to respond to the webhook:
-
If your service has determined the privacy request is eligible to be automatically approved, send a request to the
reply-to-eligibleURL sent in the original request header, along with thereply-to-tokenauth token. -
If your service has determined the privacy request is not eligible to be automatically approved, send a request to the
reply-to-not-eligibleURL sent in the original request header, along with thereply-to-tokenauth token. This does not deny the request. Instead, it flags the request for manual review by an administrator in the Admin UI.
Send an empty {} request body.
For example, to mark the privacy request as eligible:
POST /api/v1/privacy-request/{privacy_request_id}/pre-approve/eligibleMake sure to include the Authorization header: Authorization: Bearer {reply_to_token}
Error Handling
If a webhook fails to respond, times out, or returns an error:
- The privacy request will remain in a pending state (shown as status "New" in the Privacy Request UI) awaiting manual approval
- The webhook failure will be logged for debugging
- Other configured webhooks will still be called and can respond independently
- You can manually approve the request in the Admin UI at any time
This ensures that privacy requests are never automatically approved if any part of your validation logic fails or is unreachable.